
Co-Authored by Excel Dictionary's Emma Chieppor
Welcome to the third and final edition of my three-part series with Paysafe: Excel Tips For Small Business Owners. I’m Emma Chieppor, creator of Excel Dictionary, your ultimate source for impactful, digestible Excel tips and tricks. I created Excel Dictionary to help others avoid Excel overwhelm and to be the coworker that you can turn to when you need help; the coworker I wish I'd had when I first started my career as an actuary in 2020.
In this edition, we’re going to dive into the top three Excel tips you need to know as a small business owner so that you can spend less time doing the boring work and more time doing what you love: building the biz.
1. AutoSum
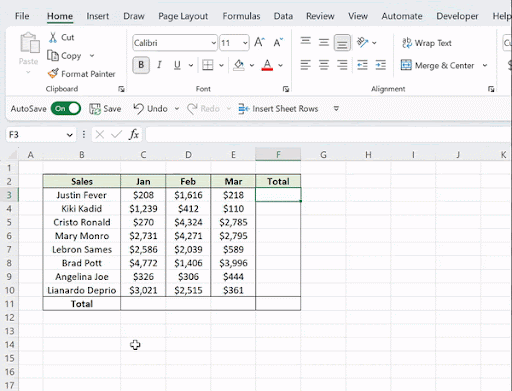
One of the most common tasks performed in Excel is summing data. Summing data manually can be a tedious and time consuming task, but luckily Excel has a built-in tool that can help: AutoSum. AutoSum automatically detects surrounding data and sums it using the SUM function. To use AutoSum, just select a cell adjacent to the data that you want to sum, press ALT = to activate the AutoSum command on the Home tab, and that’s it! Excel will automatically detect the data and sum it for you using the SUM function.
The best part about AutoSum is that it can sum all of your data at once. For example, we have sales data and we need to sum all of the rows and columns within the table. Instead of selecting each cell and pressing ALT = fifteen times, we can use AutoSum to sum all of the data at once. To do this, just select all of the cells you want to add totals to, and then press ALT = to automatically sum all of the data at once!
2. Flash Fill
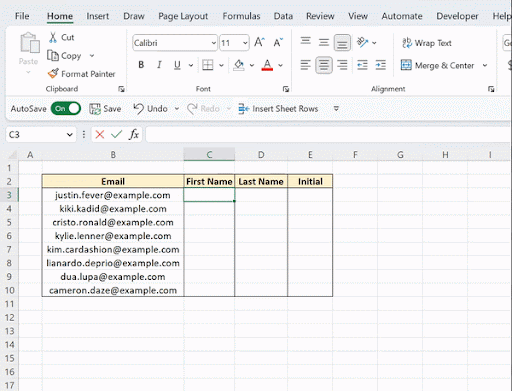
Now that we’ve learned how to sum data quickly, let’s learn how to reformat it. Let’s face it, when working with data in Excel, it’s almost never in the correct format that we need it to be in. Instead of wasting your time writing complex text functions or using tools to manipulate the data, we can use Excel’s Flash Fill tool. Flash Fill automatically fills data down a column based on detected patterns. All we have to do is enter the first row of data the way we want all rows to appear, and then activate Flash Fill on the Data tab to fill the pattern down the column!
Flash Fill can be used to separate text, combine text, reformat the case of text, remove or add text to a text string, and my personal favorite: extract text from a text string. For example, let’s say we have a list of email addresses and we need to extract the first name, last name, and name initials. This may seem like a complicated task, but Flash Fill makes it simple. Just enter the first name, last name, and initials in the first row directly next to the data, and press CTRL E in the cell below to activate Flash Fill. As you can see, Flash Fill was able to detect the pattern in the data and automatically filled the pattern down each column for us!
3. Slicers
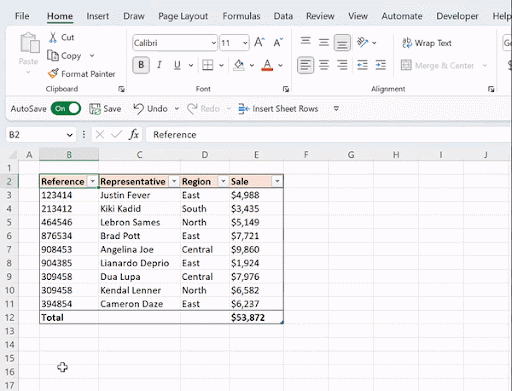
Now that we’ve learned how to automate summing and manipulating our data, let’s learn how to automate analyzing it. Oftentimes, when working with large data sets, we need to drill down into the data to analyze specific cuts to better understand what the data is actually telling us. Slicers are a powerful Excel tool that allow us to quickly drill down into data by adding filter buttons to our worksheet.
For example, let’s say we have sales data and want to drill down into specific regions to analyze sales by region. To add slicers, first you need to make sure your data is formatted as an Excel table. To format your data as an Excel table, select any cell within the data set and press CTRL T. If your data is not formatted as a table, you will not be able to add slicers! Once your data is formatted as a table, select any cell within the data again, and this time hit ALT N SF to activate the Slicers command on the Insert tab. Once the Insert Slicers dialog opens,select which field you want to drill down by, and hit OK.
Now you can quickly filter your data by region, simply by selecting the region’s button!
Excel should make running your small business easier, not harder. These three productivity tips will help you utilize Excel to your advantage to quickly accomplish tasks so you can get back to running your business!


